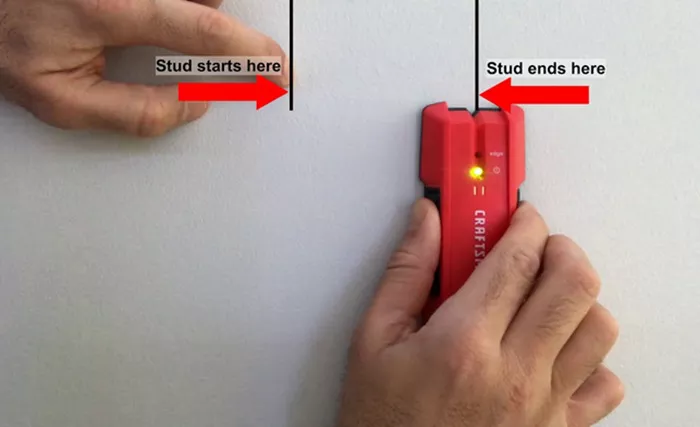
A stud finder is an indispensable tool for anyone planning to hang heavy items on walls, such as shelves, televisions, or large mirrors. By accurately locating the wooden or metal studs behind the drywall, a stud finder ensures that your mounting hardware is securely anchored, preventing accidents and damage. Here’s an in-depth guide on how to effectively use a stud finder, whether you’re a seasoned DIY enthusiast or a novice.
Types of Stud Finders
Magnetic Stud Finders: These simple devices use a magnet to detect the metal nails or screws that are embedded in the studs. They are cost-effective, reliable, and require no batteries, making them accessible for occasional use.
Electronic Stud Finders: These more advanced tools use sensors to detect changes in wall density, identifying the exact location of studs. They often feature additional settings for different materials and can be more precise.
Radar-based Stud Finders: These high-tech models employ radar technology to provide the most accurate detection of studs. They are particularly useful for professional applications or for walls with complex structures, as they can penetrate deeper and offer more detailed readings.
Step-by-Step Guide
1. Prepare Your Wall
Clear the Area: Ensure that the wall is free of any pictures, decorations, or other obstructions that could interfere with the stud finder’s operation. This step is crucial for obtaining accurate readings.
Clean the Surface: Use a damp cloth to wipe the wall, removing dust, dirt, and any residue. A clean surface allows the stud finder to work more effectively by minimizing interference from external particles.
2. Calibrate the Stud Finder
Read the Manual: Each stud finder model may have a unique calibration method, so it’s important to familiarize yourself with the specific instructions provided by the manufacturer. Proper calibration is key to accurate detection.
Turn On the Device: For electronic and radar-based stud finders, activate the device and place it flat against the wall. Most modern stud finders will automatically calibrate, but some might require manual adjustment to ensure accuracy.
3. Begin Scanning
Start from the Edge: Position the stud finder flat against the wall, beginning about a foot away from the corner or edge. This starting point helps to avoid initial false readings that can occur near the wall’s edge.
Move Slowly: Gently slide the stud finder horizontally across the wall at a slow and steady pace. Moving too quickly can result in missed detections or inaccurate readings, so patience is essential.
Watch for Indicators: Pay close attention to the device’s indicators. For electronic stud finders, this could include lights, sounds, or a visual display that signals the presence of a stud. Understanding these indicators will help you pinpoint the exact location.
See also: Why Every Homeowner Needs An Oscillating Tool In Their Toolbox?
4. Mark the Stud Location
First Pass: When the stud finder indicates the presence of a stud, mark the spot lightly with a pencil. This initial mark will serve as a reference point for further verification.
Double-Check: To ensure accuracy, make a second pass with the stud finder slightly above or below the initial scan. Confirming the stud’s location at different heights reduces the chance of errors and ensures a precise mark.
5. Locate the Stud Edges
Determine Edges: To accurately find the edges of the stud, move the stud finder left and right from the marked spot. Mark the points where the device signals the start and end of the stud.
Measure Width: Studs are typically 1.5 inches wide. Measure the distance between your edge marks to confirm the width. Accurate measurement of the stud width helps in identifying the exact center for secure mounting.
6. Verify Stud Placement
Check Regular Intervals: Studs are usually spaced 16 to 24 inches apart. Measure from your first stud mark and scan again to find the next stud, ensuring consistency and accuracy across the wall.
Use a Nail or Screw: For added confidence, gently tap a small nail or screw into the marked spot to ensure you’ve hit the stud. This step can prevent potential mishaps during the actual mounting process.
Tips and Tricks
Avoid Interference: Remove any large metal objects or electronic devices from the scanning area, as they can interfere with the stud finder’s sensors and cause false readings.
Multiple Scans: Perform multiple scans at different heights and positions on the wall to ensure the most accurate results. This approach can help account for any irregularities in wall construction.
Understand the Material: Be aware of whether your wall contains wooden or metal studs, as some stud finders have different settings or modes for each type. Selecting the correct mode improves the device’s accuracy.
Troubleshooting
False Positives: If the stud finder gives inconsistent readings, recalibrate the device according to the manual and ensure the wall surface is clean. Consistent false positives can indicate calibration issues or interference.
Thick Walls: For thicker walls or walls with complex construction, you may need a more advanced stud finder, such as a radar-based model, which can penetrate deeper and provide more detailed readings.
Irregular Studs: In older homes, studs might not follow standard spacing or placement. Patience and multiple scans at different heights and locations will help locate studs accurately in such scenarios.
Conclusion
Using a stud finder is a straightforward yet essential process that ensures your wall-mounted items are securely anchored. By following these detailed steps, you can confidently locate studs and complete your home projects with ease and precision. Whether you’re hanging a heavy mirror or installing shelves, a stud finder will be your reliable guide in ensuring safety and stability.
Related Topics:

