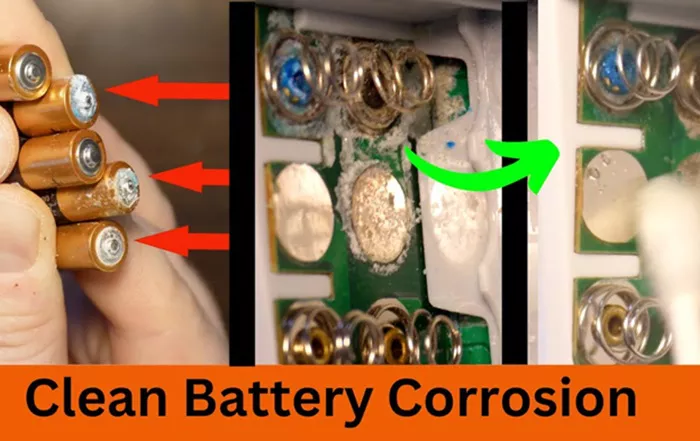
Battery corrosion, often seen as a white, powdery substance, forms around battery terminals and can significantly affect the performance and longevity of your electronic devices. It is essential to address battery corrosion promptly to avoid potential damage to your devices and ensure their optimal functioning. This guide provides a comprehensive approach to safely cleaning battery corrosion.
1. Safety Precautions
Before beginning the cleaning process, taking appropriate safety precautions is crucial to prevent accidents and ensure personal safety. First and foremost, ensure that the device is completely powered off to avoid any risk of electrical shock or short circuiting. Removing the device from its power source, if applicable, adds an extra layer of safety. Wear protective gear, including safety goggles and gloves, to shield your eyes and hands from any corrosive substances or cleaning agents. Lastly, work in a well-ventilated area to minimize the inhalation of potentially harmful fumes or dust generated during the cleaning process.
2. Assess the Corrosion
Before diving into the cleaning process, assess the extent of the corrosion around the battery terminals. Minor corrosion typically manifests as a light, powdery residue and can be cleaned with basic household items. However, if the corrosion appears extensive, with a significant buildup or if it has caused noticeable damage to the device or battery compartment, additional steps may be required. In severe cases, it might be advisable to consult a professional technician or replace the battery to avoid compromising the device’s functionality or safety.
3. Remove the Battery
Carefully and methodically remove the corroded battery from the device. If the battery is stuck due to corrosion or accumulated residue, gently wiggle it free to avoid applying excessive force that might damage the battery compartment or the device itself. If the battery is leaking or visibly damaged, handle it with extra caution and dispose of it according to local regulations. Proper disposal of damaged batteries is essential to prevent environmental contamination and potential hazards.
See also: Top Car Battery Brands: Reliability, Performance, And Longevity
4. Clean the Corrosion
For Small Areas
Use Baking Soda and Water: Create a cleaning paste by mixing baking soda with a small amount of water. Baking soda is a mild alkaline substance that can neutralize the acidic corrosion. Dip a cotton swab or a small, soft brush into the paste and gently scrub the corroded areas. The mild abrasiveness of baking soda helps to dislodge and remove the corrosion without damaging the underlying surfaces. This method is effective for small-scale corrosion and routine maintenance.
Rinse and Dry: After scrubbing, use a clean, damp cloth to wipe away any residual baking soda paste and corrosion debris. Thoroughly dry the area with a dry cloth or allow it to air dry completely before reassembling the device. Ensuring the area is dry is crucial to prevent any further corrosion or potential short-circuiting when the new battery is inserted.
For Larger Areas
Use a Cleaning Solution: For more extensive corrosion, consider using a commercial battery terminal cleaner or a vinegar-water solution. Commercial cleaners are specifically formulated to break down and neutralize corrosion more effectively. Apply the cleaning solution with a brush or cloth, and scrub the affected areas gently but thoroughly. Vinegar, being an acidic solution, helps to dissolve the alkaline corrosion while also neutralizing any residual battery acid.
Rinse and Dry: After cleaning, rinse the area with a clean, damp cloth to remove any remaining cleaning solution or debris. It is important to ensure that all cleaning agents are completely removed to prevent any chemical reactions or damage to the device. Dry the area thoroughly with a clean, dry cloth or let it air dry completely before proceeding.
5. Inspect the Device
Once the cleaning process is complete, carefully inspect the battery compartment and terminals for any remaining traces of corrosion. Pay close attention to the contacts and surrounding areas, ensuring that no residue is left behind. If necessary, repeat the cleaning process to achieve a thorough result. Regular inspection of the battery compartment helps to identify potential issues early and prevents further corrosion or damage from occurring.
See also: Husky Tool Boxes: Features, Benefits, And Types
6. Prevent Future Corrosion
To reduce the likelihood of future battery corrosion, consider implementing several preventive measures. Use high-quality batteries that are less prone to leakage and corrosion. Regularly check and clean the battery compartment to remove any dust or debris that might contribute to corrosion. Additionally, store devices in a cool, dry environment to avoid exposure to extreme temperatures or humidity, both of which can accelerate the corrosion process.
7. Reassemble and Test
Once the area is clean and dry, insert a new battery into the device. Carefully reassemble any components that were removed during the cleaning process. Power on the device and test its functionality to ensure that it operates correctly. If the device does not work as expected, recheck the battery installation and connections to confirm that they are secure and properly aligned.
Conclusion
Cleaning battery corrosion requires attention to detail and proper handling to ensure the safety and effectiveness of the process. By following these detailed steps and taking appropriate safety measures, you can effectively remove corrosion and maintain the performance and longevity of your devices. Regular maintenance and preventive measures will help to avoid future issues, ensuring that your batteries and devices remain in optimal condition.
Related Topics:
-
Should You Invest In An Electric Screwdriver For Your Toolbox?
-
How Much Is A Cord Of Wood? Understanding Costs And Measurements

